Sonoma Golf Club: California Golf Course Review
Sonoma Golf Club opened in 1928 and was
immediately hailed as one of the top courses in
Northern California. Designed by Sam Whiting and
Willie Watson, the course saw Byron Nelson, Sam
Snead, Harvey Ward and Ken Venturi walk it's
fairways and greens. It was Snead who may have
bolstered the credibility of the course when he told
then San Francisco Examiner sports reporter Art
Rosenbaum that it was his favorite layout.
In recent years the club hosted the best players
on the Champions Tour when it hosted the Charles
Schwab Cup Championship from 2003 to 2009 when
it saw great such as Tom Watson, Jim Thorpe and
John Cook raise the trophy. It was Watson who
stated that the slick greens were as close to Augusta
National in speed and condition as he had putted
on.
Following are playing notes for Sonoma Golf
Club. Stocker Cup players - you may want to print
this out or save a link on your cell phone!
FRONT NINE
1st Hole - Par 4 - 386 yards
The first hole is a gentle starter. Originally a
dogleg right, the hole was changed to a dogleg left
in 1991 during a renovation that saw the addition of
a driving range. Out of Bounds flanks the left side
while a bunker protects the right hand portion of the
fairway. An imposing tree provides the most
character off the tee. The conservative play is a
long iron or fairway wood hit towards the aiming
bunker with a slight draw, while the aggressive play
is a driver over the tree, leaving a short wedge
approach. The slopes away from the player in the
back left portion, while the front portion slopes
back-to-front. All putts on the golf course break
towards the back of the 2nd tee, or as local lore
states "towards downtown Sonoma).
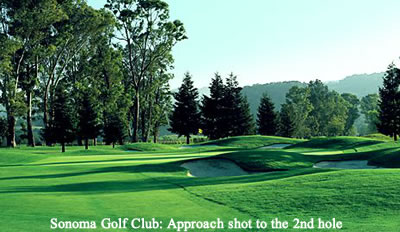 |
2nd Hole - Par 5 - 552 yards
The 2nd is a strong uphill par-5. The prevailing
wind will be into the player on this hole, making it
nearly impossible to reach the green. The long hitter
will find their drive landing into an upslope, which
will negate any roll. The layup should avoid the
bunker and tree to the left of the fairway. The
green slopes subtly from back to front with the back
bunker being a spot to avoid at all costs.
3rd Hole - Par 4 - 409 yards
Somewhat of a sleeper hole, the 3rd hole has
ruined many a round. A straight hole with
everything in front of the player, the right fairway
bunker should be avoided off the tee as the lip can
pose a problem and prevent the player from reaching
the green. The deep green is protected on the front
left by a bunker and the majority of the right side by
another bunker.
4th Hole - Par 3 - 204 yards
One of the most challenging holes on the
Champions Tour, the 4th is a stern test. Playing
slightly uphill to a narrow and deep green. Balls
finding the array of bunkers that are on the right and
left sides of the green will be difficult to get up and
down, due to the shallowness of the green from that
angle. Hole locations can be tough with a flag back
right being the toughest. Beware of a front hole
location as missing long almost always leads to
bogey or worse.
5th Hole - Par 4 - 431 yards
The 5th is another strong par-4. Bunkers protect
the landing area on both the right and left side of
the fairway. A long drive will leave an approach to a
large green that has several slopes stretching out
from the bunkers that surround the green.
Aggressive play doesn't always pay off on this hole
as long of the green sees out of bounds very close to
the back of the green.
6th Hole - Par 4 - 417 yards
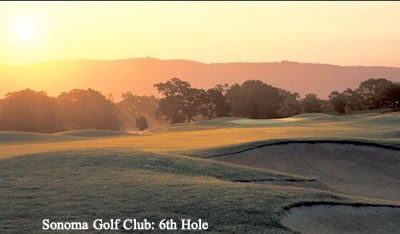 |
A medium length par-4, this hole often plays
downwind. A fairway bunker on the right and a
hazard on the left are to be avoided. Once the
fairway has been found, the green slopes away from
the player and is very deep. Hole locations on the
back 1/3 of the green can often see the ball release
well past the flag and off the green.
7th Hole - Par 3 - 219 yards
The signature hole at Sonoma Golf Club, the 7th is
another strong par-3. A creek runs the length of
the right side of the hole while the green has 3
bunkers surrounding it. A long iron or hybrid is most
commonly needed to find the tricky green. Once
again, long is a bad decision as the green slopes
away from the player.
8th Hole - Par 5 - 596 yards
The 8th hole is the longest on the course but
benefits from playing downhill and often downwind.
The landing area is blind off the tee so players
should aim at the tallest of the eucalyptus trees in
the distance. A fairway bunker on the top right
portion of the fairway is shadowed by another
fairway bunker in the right portion of the landing
area. Out of bounds and large eucalyptus trees
flank the left side of the fairway. A good drive
might give the longer hitters the chance to go at the
green in 2, but most will have to layup and avoid a
fairway bunker on the right and a group of trees on
the left. The green has several small shelves which
can make for tricky hole locations.
9th Hole - Par 4 - 345 yards
A classic short par-4, the 9th gives the player the
option to lay up short of the fairway bunker or hit
driver over it, leaving a short pitch the green. The
2nd shot plays uphill to a green that has 3 tiers. If
the hole location is in the front, it is best to be
coming in from slightly further back in order to
control the spin. Two deep bunkers protect the
front of the green, while another bunker sits
towards the back right of the green. This green can
be very quick if putting down the tiers.
BACK NINE
10th Hole - Par 4 - 425 yards
The 10th offers a great view from the elevated tee
across the lake and down the expansive fairway. A
large oak tree hugs the left side of the fairway and
balls that look to be missed to the right often find
the fairway as it expands further than it looks. The
2nd shot plays downhill to a tricky green that slopes
away from the player. The bunkers to the right of
the green are very difficult to get up and down
from.
11th Hole - Par 4 - 359 yards
Another short par-4, the 11th plays straight uphill.
The tee shot should favor the right side of the
fairway as it opens the green up. 3 bunkers sit on
the left-side of the green while another hugs the
right. A very sloping green can be difficult,
especially if the hole is in the front and the player
has missed long. Tom Kite once made eagle on this
hole in back-to-back days during the Schwab Cup.
12th Hole - Par 4 - 427 yards
The 12th is one of the most underrated holes on
the course. A straight hole which often plays into
the wind, the tee shot needs to avoid the bunker on
the right side of the fairway. The approach plays
uphill and the green is one of the trickier on the
course. A large spine runs down the middle of the
green and a false front will often see the ball roll
back down the fairway. Missing this green long is
not an option as getting it up and down for par is
rarely successful.
13th Hole - Par 5 - 587 yards
A reachable par-5, this is one of the best scoring
options on the course. The drive needs to favor the
right side of the fairway, but avoid the fairway
bunker and trees. Tee-shots missed left usually kick
further left and might not be found. From the
fairway, players can opt to challenge a green that is
flat and tends to run away somewhat, or layup to a
wedge yards avoiding the bunkers on the left and
the water on the right. This green is often misread.
14th Hole - Par 3 - 215 yards
A slightly downhill par-3, the 14th will see players
have a long iron in hand to a large green. The
front hole locations are the easiest on this hole, while
the back left can be difficult. The green slopes away
from the player in the back right portion.
15th Hole - Par 4 - 436 yards
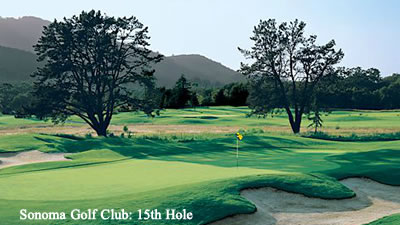 |
Generally considered to be the toughest par-4
on the course, the 15th gives the player options off
the tee. The aggressive play is a driver over the
trees on the right, cutting the corner and leaving a
short iron approach. The more conservative play is
a fairway wood off the tee left of the trees and a
long iron approach. The native grass on the right
should be avoided if a good score is to be had.
16th Hole - Par 5 - 541 yards
The downhill par-5 16th offers one of the tighter
tee-shots on the course. Players that can find the
left portion of the fairway will be rewarded with a flat
lie and a chance to attack the green in 2 shots. The
green slopes from back to front and is protected by
several bunkers. One of the best birdie opportunities
on the course.
17th Hole - Par 3 - 142 yards
The only par-3 on the course that the player won't
have a long iron in hand, the 17th poses a different
kind of challenge. The bunkers around the green are
very difficult to get the ball up and down from, with
balls often plugging. A hole location back right
generally plays 1 club longer and offers a shallow
area of green to approach.
18th Hole - Par 4 - 412 yards
The closing hole once again offers the longer hitter a
decision. Take it over the fairway bunker on the
right and have a short club to the green, or layup
short and approach the green with a mid-iron. Once
the fairway has been found, the approach must avoid
the overhanging tree on the left side of the green.
A severely sloping green in the front portion can
lead to 3-putts if the flag is located there and the
ball is missed long. A small creek crosses in front of
the green and can't be seen from the fairway.
- note: All images courtesy Sonoma Golf Club