
If you’re envisioning your own DIY golf simulator but are unsure how to start, this guide is your gateway to building a personalized setup step-by-step. This article series comprises three essential parts: Part one focuses on measuring for your golf simulator screen and pads, part two delves into constructing the frame and attaching the screen, and the final part covers building an enclosure for your simulator.
RELATED: How to Construct a Golf Simulator Frame and Mount the Screen (Part 2)
RELATED: How to build a golf simulator enclosure (part 3)
Understanding Key Terms:
Before you begin, familiarize yourself with these terms essential to any golf simulator setup:
1. Screen: The central projection surface.
2. Gap pads: Fill gaps between screen and frame.
3. Enclosure: The surrounding structure.
4. Launch monitor: Tracks ball and club data.
5. Hitting mat: Surface for striking the ball.
6. Landing Pad: The turf between the hitting mat and the screen.
7. Frame pads: Protect the frame and golfer.
Measuring for Your Golf Simulator Screen and Pads:
Accurate measurement is crucial for a well-functioning golf simulator. Follow these steps to get started:
1. To guarantee a perfect fit, record the precise spacing between opposite walls to determine the ideal dimensions for your screen's frame.
2. Note any obstacles like light fixtures, vents, soffits, or woodwork, that might affect screen or frame placement.
3. Think vertically and consider the room's ceiling height to create an optimal experience.
4. Plan for future upgrades that might impact screen size or placement.
Example Measurements:
For example, let's use a room measuring 200” W x 300” D x 130” H as an example. For maximum viewable screen width, deduct 20 inches (or 10 inches per side) to account for a 1.5” 2x4 frame, a 1.5” slotted angle iron attached to the 2x4 frame, a 4” gap between the screen and angle iron, and 2” of Velcro on the sides of the Ace HiQ screen. This 10” width on each side will be the width of your simulator Side Gap Pads.
Max viewable screen width calculation: 200” Room Width - 20” = 180”
Side Gap Pads Height: 131” (includes 1” extra at the bottom)
Side Gap Pads Width: 10” per side
Top Gap Pads Width: 200” (Room Width)
Top Gap Pads Height: Calculate using an aspect ratio calculator for optimal screen dimensions (16:9, 16:10, or 4:3) – see below.
Side Frame Pad Height: 130” Room Height - 6” for Top Frame Pad + 1” extra at bottom = 125”
Side Frame Pads Width: 6” standard size for frame pads
Top Frame Pad Width: 200” Room Width
Top Frame Pad Height: 6” standard size for frame pads
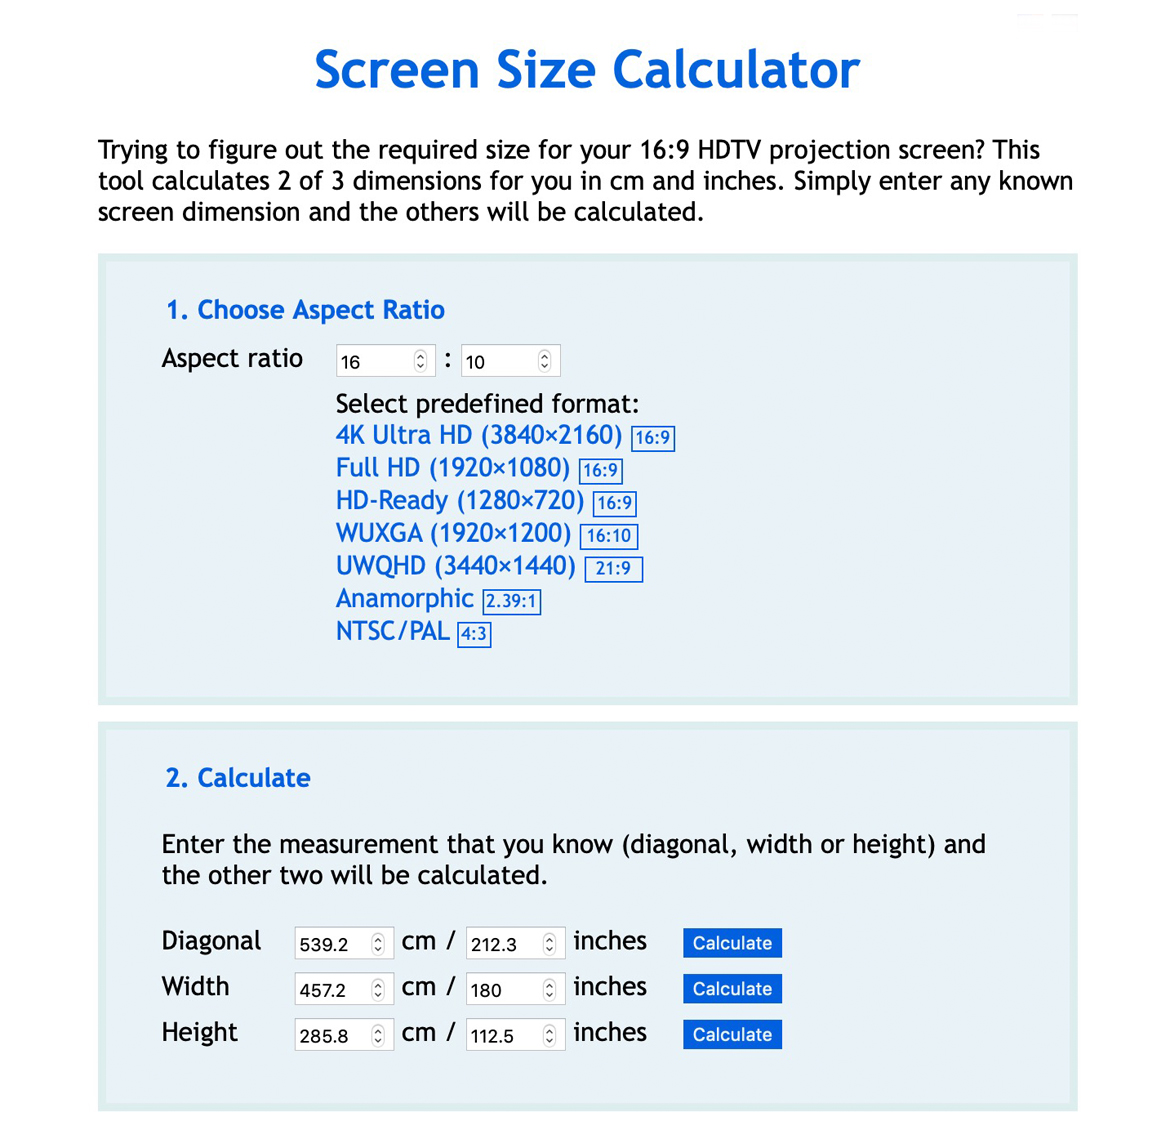
In the aspect ratio calculator, enter the length of your available space less the 10” spacing on each side discussed above. Select different aspect ratios to find the largest screen image that will fit into your space. In the example below, we input 180” for the viewable screen width (200” – 20”), and the calculator generates the following screen heights.
- 16:9 screen size = 180” W x 101” H
- 16:10 screen size = 180” W x 112” H
- 4:3 screen size = 180” W x 135” H
Choose the ratio that best fits your space without wasting screen image area. For this example, the 16:10 Aspect ratio provides the largest screen size. Subtract the viewable screen height from the room height to get your Top Gap Pad height.
130” Room Height – 112” Screen Height = 18” Top Gap Pad Height
Ordering Your Equipment:
In this scenario, a 4:3 Aspect ratio is unsuitable due to the room's 130” height, as the screen size would be taller than the room height. In contrast, both 16:10 and 16:9 Aspect ratios are viable options. Notably, the 16:10 ratio offers the largest screen size. However, choosing the 16:9 ratio will require extra long cable ties to accommodate the screen's placement 29” from the Top Frame or ceiling, increasing the Top Gap Pad height and cost. For reference, the viewable screen dimensions for the 16:10 aspect ratio will be 180” W x 112" H, while the actual screen dimensions, including the Velcro, will be 184” W x 114” H from edge to edge. With these specifications, you can now order your Ace Indoor Golf HiQ screen, Gap Pads, and Frame Pads with confidence.
Consider Professional Assistance:
For a hassle-free experience, Ace Indoor Golf offers a design service for $600. They'll assess your space and recommend the ideal simulator setup based on your measurements.
With these guidelines, you’re well-equipped to create a bespoke golf simulator screen that perfectly suits your space and gaming preferences. Get ready to tee off in your personalized indoor golf haven! For more information, visit Ace Indoor Golf’s golf simulator screens and enclosures page or call (855) 926-3283.